If you want the highest quality final photo for any purpose, you need to be familiar with your post-processing software’s output settings. For many photographers, this means using Lightroom’s “Export” dialog to get the best results. But not all of these settings are completely intuitive, and you certainly don’t want to make a mistake in the final step of the imaging process. So, this article covers everything you need to know about the best Lightroom export settings to use.
First, it’s worth mentioning that Lightroom does not have any way to “save” or “bake in” edits to the file you are editing aside from this export dialog. So, unless you follow the steps below, the only place you can see your photo edits is within Adobe’s own software, like Lightroom or Adobe Camera Raw.
The Export dialog in Lightroom is organized into nine parts: Export Location, File Naming, Video, File Settings, Image Sizing, Output Sharpening, Metadata, Watermarking, and Post-Processing.
Taken together, they look like this:
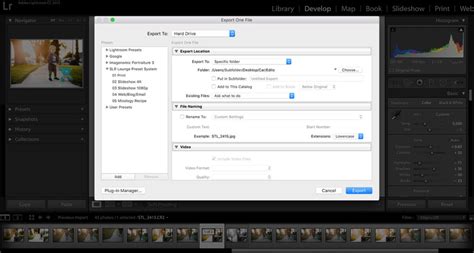
I’ll go through the basics of each option briefly, then explain my recommended settings. Export Location: Nothing fancy here. You simply select where you want to output the photo, plus whether you want to add the photo to the Lightroom catalog you’re working with. Also, you get to choose what happens when you export a photo to the same place twice. File Naming: A flexible option that lets you name your photo upon export, either to a custom file name or a naming preset (including almost limitless choices for creating new presets). Video: Not applicable to this discussion. File Settings: Here, you select file type (JPEG, TIFF, etc.), color space, and image compression settings. These are all very important to maximizing your final photo’s image quality. Image Sizing: Simply the final resolution of your photo (number of pixels wide and tall), with various ways to calculate that number. Output Sharpening: Very basic global sharpening adjustment upon export. Metadata: Control what additional information about a photo gets stored within its file, like the camera settings, copyright information, and location details. Watermarking: Add a watermark to your desired position within a photo. Post-Processing: Decide where to open your final photo (i.e., in what other software program) after Lightroom finishes exporting it.
Next, I’ll explain my recommended Lightroom export settings for three common scenarios: exporting for maximum image quality, for printing, and for web use.
Exporting for Maximum Quality
Interestingly, this is actually the least common scenario - exporting photos from Lightroom for maximum image quality. And that’s simply because the settings which maintain as much image quality as possible do not work well for printing, and especially not for web usage. They also produce huge file sizes, in the range of 200 MB or more. But there is one very good reason to export images at maximum quality: you’re not done editing them! If there’s still more work to do on a photo in other post-processing software, you definitely don’t want to throw out that photo’s data prematurely.
For now, you can ignore all the export options except numbers 4, 5, and 6 - File Settings, Image Sizing, and Output Sharpening. I’ll come back to the others later.
File Settings
Image Format: TIFF, in general. DNG, TIFF, and PSD are all lossless. DNG has the smallest file size, but it only shows your edits in other Adobe software. PSD has the largest file size of the three and may not open in non-Adobe software.
Compression: ZIP compression. This shrinks file size without impacting image quality at all. However, note that compression can make it slightly slower to open and work with a file. Old software occasionally has issues opening compressed TIFFs, but this is unusual.
Color Space: ProPhoto. Never let a ProPhoto image loose in the wild unless you really know what you’re doing. However, for outputting at maximum image quality - to edit in other software on your own computer - ProPhoto maintains the widest possible range of colors in your photo without clipping. Just don’t forget to save the photo in a different color space later.
Bit Depth: 16 bits/component. This increases file size but keeps far more data than 8-bit, minimizing your chances of banding in the sky or other areas of uniform color.
Image Sizing
Resize to Fit: Leave box unchecked; do not resize your photo at all.
Resolution: Does not matter what you put; inconsequential to image quality. Occasional old software may read this value to determine how large to display your photo by default, but this is rare. I leave it at the default of 240 pixels.
Output Sharpening
Sharpen For: Leave box unchecked; do not sharpen your photo at all.
Exporting for Print
Another common type of export scenario is for printing. You’ll find that many of the print settings are similar to those from the “maximum quality” settings above, but there are some important changes. Part of the difference depends on whether you print at a high-end lab, a low-end lab, or on your own printer at home. I’ll go through those scenarios below.
File Settings
Image Format: TIFF or JPEG. TIFF will have no compression artifacts and allows 16-bit export, so it is best for critical images. But for simple printing applications, or for sending high-megapixel images online, JPEG will drastically reduce your file size with generally minimal image quality loss.
Compression/Quality: ZIP compression for TIFF; 100 quality for JPEG. As before, ZIP compression does not harm a TIFF file, though some rare software options cannot open it properly. As for JPEG, lowering the “quality” setting will visibly increase compression artifacts. It is not worth the smaller file size in this case.
Color Space: A tricky one. For JPEG exports, pick sRGB to minimize banding. Otherwise, the end-all-be-all is to export TIFF files directly to the custom ICC profile for the specific paper/ink combo you’re using. But unless you’ve done this before and fully understand sRGB vs Adobe RGB vs ProPhoto RGB, a lot can go wrong here that leads to bad prints. (It is also potentially better to do this conversion in Photoshop, where you have control over variables like perceptual vs relative colorimetric intent.) If all that sounds too intense, don’t do it; instead, follow your print lab’s guidelines and simply send them a TIFF in ProPhoto (if allowed), Adobe RGB (if ProPhoto is not mentioned as acceptable), or sRGB (if neither ProPhoto nor Adobe is mentioned as acceptable). Enable the lab’s “color correction” option upon checkout if one exists.
Bit Depth: 16 bits/component (only available for TIFF).
Image Sizing
Resize to Fit: Leave box unchecked; do not resize your photo at all. Some low-end labs may refuse to print your photo if it does not have enough pixels for the size you’re printing, so occasionally you may want to increase the photo’s total pixels accordingly. But this is rare and does not improve image quality - simply placates the print lab.
Resolution: Does not matter what you put; inconsequential to image quality. Occasional old software may read this value to determine how large to display your photo by default, but this is rare. I leave it at the default of 240 pixels.
Output Sharpening
Sharpen For: It depends. For truly critical work, it is better to export the photo without any sharpening. Then, sharpen manually in Photoshop or similar software to match tests you’ve done as to the ideal sharpness setting for the particular ink/paper combo you’re using. In practice, this is more work than most photographers care to do. Instead, just click the checkbox and select “Matte” or “Glossy” depending on the type of paper you’re using, and then “Standard” for the amount.
Exporting for Web
The most common destination for most photos is the internet. In that case, the detailed recommendations above simplify tremendously. Again, for now, we’re only focusing on the three critical Lightroom export options for image quality: File Settings, Image Sizing, and Output Sharpening.
File Settings
Image Format: JPEG in most cases. One exception - if you are uploading screenshots or digital illustrations, the ideal format is PNG, but Lightroom does not allow this (except by exporting “Original” file format, which eliminates most of your remaining choices). So, you may need to export the photo from Photoshop or something similar instead. You can also check the “Limit File Size To” box and set something reasonable like 1000 K - what I do for Photography Life exports. For exporting to social media sites, there is nothing wrong with selecting 100 quality, because almost all of them will compress the photo themselves if it is too large.
Color Space: sRGB, period.
Image Sizing
Resize to Fit: It depends on the output location. We do 2048 pixels for Photography Life.
Resolution: Does not matter what you put; inconsequential to image quality. Occasional old software may read this value to determine how large to display your photo by default, but this is rare. I leave it at the default of 240 pixels.
Output Sharpening
Sharpen For: Screen, standard.
Exported at 2048 pixels, 1000 KB maximum, sRGB, Screen Standard sharpening. Click to see full size.

Other Recommended Settings
The settings above are the most important. However, I skipped over my recommendations for some important options: export location, file naming, video, metadata, watermarking, and post-processing. I’ll cover those below.
Export Location
Export To: I choose “Specific Folder.” It’s the obvious choice, because it lets you manually select where the exported photo will appear. You should pick “Choose folder later” if you are creating a preset where you won’t always be exporting to the same folder.
Put in Subfolder: Not worth using, unless you want to export an image to a folder that does not yet exist. This creates that new subfolder.
Add to This Catalog: Leave unchecked, unless you have a reason to add all your exported JPEGs and so on to your Lightroom catalog. For me, it just adds clutter for no real reason.
Existing Files: Ask what to do. If I’m exporting a file to a location where the same exported file already exists, it is usually a mistake, or I’m intentionally trying to overwrite the old file. Either way, this is the type of thing I want Lightroom to notify me about.
File Naming
Rename To: There are a lot of different philosophies here. Personally, I just export images without changing their name. But I already have a custom import preset in Lightroom to change file names so that no two photos of mine will ever have the same name (and thus accidentally overwrite one another). If all your photos are simply “DSC_1234” or similar, you’ll start duplicating file names after taking 10,000 photos, which is not good. The RAW files will very likely not overwrite one another, but the exported files might. If you’re worried about that, export with a custom file name. My template is: [Date (YYYY)]-[Julian Day of the Year]-[Hour]-[Minute]-[Filename]. Feel free to use this, although I recommend using it as your import template rather than export preset.
Custom Text: Fills in the blank if your “Rename To” selection includes a “Custom Name” component.
Start Number: Fills in the blank if your “Rename To” selection includes a “Sequence” component. This is useful, especially in combination with the Custom Text option, if you have a large set of images which should have a similar file name. For example, Alaska-1, Alaska-2, Alaska-3, and so on. Just select “1” in most cases, unless you’re continuing a previous export.
Extensions: Does not matter at all to most users; you almost certainly know already if it matters to you. A few esoteric software options will behave differently with one or the other. I leave mine set to Lowercase.
It’s a good idea to make sure you do not have duplicate file names of any kind, or you may inadvertently overwrite an important image.
Metadata
Include: Copyright Only will delete almost all the EXIF data from your photos, even things like the time and date you captured it. All Except Camera Raw Info is a good choice to retain almost all the EXIF data, but not specific things like your Lightroom slider adjustments (if you want to keep your process hidden for whatever reason). All Except Camera and Camera Raw Info is useful if you want to retain data like the time and date of the photo capture, but not your specific camera settings. All Metadata is what I personally select, because I actually want as much of my photo information to be visible as possible. However, this is because I write for Photography Life and want to make sure people can figure out my process for particular images. If you want more privacy in your data, I suggest not selecting this option.
Remove Person Info: Generally check this box; otherwise, person keywords are included in the metadata of your image, a privacy violation for your subject in most cases.
Remove Location Info: Generally check this box; the easiest way for a little-known location to turn into a free-for-all overnight is for a popular photographer to post the GPS coordinates where it was taken. (If you don’t shoot with location data, this box is irrelevant.)
Write Keywords as Lightroom Hierarchy: Keep your hierarchical keywords in the exported file. Check this box if you plan to open the image back in Lightroom and want the keywords intact. I leave it unchecked because I do not use Lightroom keywords for organization.
Watermarking
Watermark: Up to you whether to include watermarks on your exported images or not. I don’t use watermarks personally, but Lightroom has pretty decent watermark customization options under the “Edit Watermarks” option. Play around with the sliders or upload a custom PNG with the logo you want.
Post-Processing
After Export: I almost always select “Show in Finder” so the photos I’ve just selected pop up afterward. It makes it easy to upload them to my inte...
How to Export Lightroom Photos as JPEG
Export presets make it faster to export photos for common uses. Exports photos as JPEGs converted to and tagged as sRGB with maximum quality, no scaling, and a resolution of 240 pixels per inch. Exports photos in DNG file format. Exports photos to the hard drive as sRGB JPEG files. Exported photos have a maximum size of 640 pixels (width or height), medium quality, and a resolution of 72 pixels per inch. Upon completion, Lightroom Classic shows the photos in the Explorer (Windows) or the Finder (Mac OS). modified presets. folder that can be opened with a set of photo files. or alias (Mac OS) in the Export Actions folder. dialog box the next time you export photos. Lightroom Classic supports plug-ins from third parties that add functionality to the Export dialog box. Depending on what third-party plug-ins you have installed, different options may be available in the Export dialog box. To add a plug-in to Lightroom Classic, click the Add button.
Unlike most tools, when you crop, Lightroom doesn't actually crop to a specific file size. Rather, it's just a ratio or a shape, a relative size. When you go to print the file or display it for the web, that's when the new file is generated and you'll need to make some specific choices during the export process. Remember, when you're working in Lightroom, it's a parametric image editor, which means all the adjustments you're making aren't actually changing the real pixels, the original file. Rather, it's a set of instructions. You have to export that file in order to apply the changes and make a conversion in format or resolution.
Let me show you. Here, we've got this next image, and I'm gonna go under the Crop tool and select a five by seven print. Let's address the crop slightly. That looks good. Press Return. Now, I'm going to export. During the export process, I need to specify what's happening. So I'm going to export this to my hard drive. I'll need to pick a location. In this case, I'll go to the desktop. I can decide how the file is named, and come down to the file settings. In this case, I'm going to make a high-quality print as a TIFF file. Now, the important area here is the image sizing. Since this is going to print, I'll choose a resolution of 300 pixels per inch. Anything between 240 and 600 pixels per inch is commonly used for print, depending upon quality. The more pixels you fit per inch, the tighter the resolution of the image and the sharper it will look when printed on a high-quality printer. Now I'm going to take a look here at the resize image to fit. What I want to do is enter a width and a height. So if this is 300 pixels per inch, my width for the 5 is going to be 300 pixels times 5 inches. or 1,500 pixels and if I come over here my height of 300 pixels per inch times 7 inches is 2,100 pixels. In that case I put in the correct width and height. Additionally if you only want to specify one edge you can do so and even switch to something as simple as inches, saying, hey, this is a 7-inch print. You don't even have to do the math. If you like doing math and you want to multiply things out, that's fine. You can specify the total number of pixels. In this case, I kept it really simple. I knew my intended output was going to be a print, so I measured it in inches. If I knew my output was going to be a screen, then I would measure that in pixels. Social media, pixels. So it really just depends upon the target. Now we've got everything set. I'm going to sharpen, not for the screen, but for glossy paper. And I'm gonna include all my metadata because this is a file that I'm keeping for myself. All looks good. And I'll say when I'm all done, go ahead and show the file in the Finder. Let's click Export. The file is made, and if we open it up, you'll see we have our high quality file. If I were to open that into an application like Photoshop and we take a look at the image size, set this to inches, you'll see we have our five by seven at 300 pixels per inch. Lightroom lets you be incredibly specific on these exports. Just remember that you take the time to crop to the shape or aspect ratio that you want, and then during the export stage, specify either the resolution or the print size that you want.
When you want to share a photo with someone, be it a friends, family, or a client image, you will at some point need to export an image out of Lightroom.
Are your lightroom exports blurry? Here's what to do. Check the settings on export. If a photo is sharp in Lightroom and blurry out of Lightroom it is most likely that the problem is with the export settings, making the exported file too large or too small and hence blurry when viewed out of Lightroom.
I export images from Lightroom for issue to clients with the following settings: Image Format - JPEG, Quality - 92, Colour Space - sRGB, Limit File Size to 5k. I do not change anything else and I have never had a problem with images exported from Lightroom being blurry. That is the quick answer - if you are happy with this then great, but if you want to know more please read on - there is more good stuff in this post I promise you. There are also other settings that affect the sharpness of an image, but this is the main cause.
And as with all my blog posts I will not go into irrelevant detail - I will tell you what you and I need to know and know more.
I am an architectural and construction photographer. I have been using Lightroom since it was first launched in 2007 with version 1.0. So I have been with Lightroom from the very beginning. And I use Lightroom all the time. YES ALL THE TIME!! All my photos are in a single Lightroom Catalogue. I import my photos into Lightroom where I edit them. Once edited I export photos out of Lightroom for issue to clients. The original edited files remain in Lightroom.
Why do I export photos out of Lightroom?
I take photos using the RAW file format. If I issue these files to clients they will not be able open them unless they have specialist software. So I export photos out of Lightroom converting them to the universal JPEG file format.
How do I export out of Lightroom without losing quality?
There are various settings that you can change in Lightroom. As I said before, these are the settings that I use to export images without losing quality:
- Image Format - JPEG
- Quality - 92
- Colour Space - sRGB
- Limit File Size to 5k
Image Format
JPEG is a universal file format that anyone with a device can read without additional software. JPEG files are also smaller than RAW files so take up less bandwidth and hard drive space.
Quality - 92
This is the one that can cause problems. The higher the quality you export at the sharper the image will be. Try this out for yourself. Export an image out of Lightroom at 25%, 50%, 75%, 92% and 100%. And also check out the file sizes. You will find that you cannot visually tell the difference between 100% and 92%, but look at the file sizes. And the lower the quality the worse the images look.
Colour Space
I use SRGB as my default colour space. Why? I was recommended to years ago by someone who knows more than I do, and all is fine. I do not really know why and am fine with this!
File Size
I limit the file size to 5k. I do not really want files bigger than that to issue to clients. Normally images exported at 92% are fine - I just want to know if I have a file larger than 5K so I can do something about it.
And the other export settings?
I don’t change anything else for issue to clients. I have a number of export presets which I have made. These export settings are specific to the intended use of images. The main variables are image size and quality.
Settings for photos for my blog
- Image Format - JPEG
- Quality - 50
- Colour Space - sRGB
- Limit File Size to 100k
I also change the image size, making the long edge 900 pixels. Why do I do this? 900, 1000 - either is fine.
A word on image viewers
Some image viewers might make images look blurry after exporting them from Lightroom due to them being poorly written. This problem is nothing to do with the file, just the way that the viewer was created. Answer to this problem is to ditch that viewer straight away! And to check this just open an exported photo in Explorer or Finder and the default photos Apps should show you if the image is sharp or not.
Keep it simple. I do not use any other photo viewer outside of Lightroom other than Microsoft Photos. I don’t need another way to view photos. It is always better to keep things simple!
Does this affect my architectural and construction photography? No. I have had this nailed down for years. One thing I do want to say though is this. I issue my clients with a low resolution set of images. This creates a super small file which is still pretty sharp. Trust Lightroom. Lightroom presets are pretty solid and should always give you really sharp images.
Other things that can make a photo blurry
There are a couple of settings in Lightroom that affect the sharpness of an image, but you should be able to see this in Lightroom.
- Detail slider - I tend to use 50-75 for the detail slider.
- Noise Reduction - I don’t use this as I take all my photos at the lowest ISO possible so noise is not an issue to me. But if you do use noise reduction in Lightroom just be careful and check what is happening at 100% magnification.
Lots of other settings can affect image sharpness but you will see this as you move the sliders.
How to check for sharpness
View images in Lightroom at 100% (1:1) to see if they are sharp or blurry. Zoom in, scroll around see what you can see. If the captured image is blurry there is not much you can do.
Getting sharp photos
I wrote a blog post which is relevant to the bit before exporting out of Lightroom - 11 easy steps to sharper photos on Canon 6D. Yes we all need to take sharp photos in the first place.
Anything else? I hope that you have found this post helpful and informative.
From the Develop Module in Lightroom, simply select all the images that you’d like to export, then click File → Export in the top left corner. The first thing that you have to decide is where you want your images to live after you export them. I always save my images on an external hard drive. I always choose “Custom Name - Sequence” from the drop down menu. You’ll want your image name to be search engine friendly. What does that mean? Pro Tip! You’ll want your Image Format to be JPEG, and the Quality 100. The only time I use the “Resize to Fit” option is if I resize the images for blog or social media. Lastly, all you have to do is hit “Export” and you’re done. If you want to take it one step further, you can save all of these settings into a preset, and when you’re ready to export your images, you can just click File → Export with Preset. That’s it!
Adobe Lightroom is renowned among photographers for its robust editing capabilities and streamlined workflow. But once the editing is complete, the final step is to export your images for use outside of Lightroom. Exporting images from Lightroom involves a variety of settings, each impacting the output quality. In Lightroom's Library or Develop module, select the photo or photos you want to export. Go to 'File' > 'Export', or simply hit 'Ctrl+Shift+E' ('Command+Shift+E' on macOS).
- Export Location: Choose where you want to save the exported file.
- File Naming: You can keep the original filename or choose to rename the file.
- JPEG is the most commonly used format due to its compatibility with most devices and platforms. For most online and print uses, sRGB is the safest choice. If you're exporting as a JPEG, you'll see a 'Quality' slider. A higher number gives you better image quality but a larger file size.
- This option lets you limit the exported file's size, but using it might compromise image quality. In most cases, you'll want to export your image at its full resolution. This can be useful if you're exporting for display on a screen or for print.
Once you've chosen your settings, click 'Export' to complete the process. Exporting images from Lightroom does not need to result in a loss of quality. By understanding and correctly using the export settings, you can ensure your photos look their best when viewed on any device or medium. The key is to know your intended use for the image after export. While Lightroom offers a default set of export settings, mastering the customization of these parameters is crucial for professional photography work. When dealing with file formats, remember that while JPEG is most commonly used due to its broad compatibility and smaller file size, formats like TIFF and PSD offer higher quality at the cost of larger file sizes. The quality slider is a key factor in maintaining image detail while managing file size. Take care with image sizing and avoid upscaling your images, as this can degrade quality. The art and science of maintaining image quality while exporting from Lightroom can seem complex, but with practice, it becomes second nature. Remember that these settings are tools to help you achieve your creative vision. Experiment and find what works best for your workflow and your images.
In today’s video, I’m going to take you behind the scenes in Lightroom. I had many people asking about my export settings for high-resolution photos and what numbers I have for my wedding clients when I export their galleries. My goal when exporting high-resolution JPEG images is to get as much of the best resolution as possible so I can then throw it onto a drive, onto a cloud, and back it up. First things first, click on the export button in the library module of Lightroom. You need to be inside the library module in order to export your images. For export location, you need to decide where is the file actually going to go? Will it go on a computer, on a hard drive, or somewhere else? I can choose a specific folder if I’ve already named a folder and drop all of the JPEGS into that. I personally like to have all of my images go into a specific folder on my desktop and I name the folder something useful. Make sure to name your file something that is easy to remember. After we decide on the location and name the file, we’ll then setup the file settings. I choose JPEG image format and I want the quality setting to be at 100. For the color space setting, you want it to be at sRGB. After you choose the file settings. you’ll setup the image quality. If I’m doing an archival JPEG, I will NOT re-size to fit anything because you don’t want to limit the size. Finally, you’ll have the option to sharpen the image. Lastly, you’ll setup any metadata which is any Lightroom information or keywords that you put into the file when you were originally creating the file and importing it. Watermarking settings will allow you to add your logo or signature to any of your images. If you want to do this you have to pre-make your watermark in Lightroom PRIOR to the creation and exporting of the file. You have to create your watermark first and then it’ll show up as an option in the settings. The final decision you get to make is in your post-processing So, after you export, what do you want it to do? Many times people want to open up the files in Photoshop, makes a few changes if needed, but I normally do nothing with this setting. Once I’m satisfied with my settings, I’ll click ok and export the files. So, there you have it! That’s how I export high-resolution images and the settings I use.